Windshield Repair Kit
Product Not Available
For Inquiry
Delivery Options Available
- 1 -2 Days Normal Delivery
- 24hr Hours Express Delivery
Sold By
CA005Warranty
NOEasy Return
Available, T&C ApplyDescription
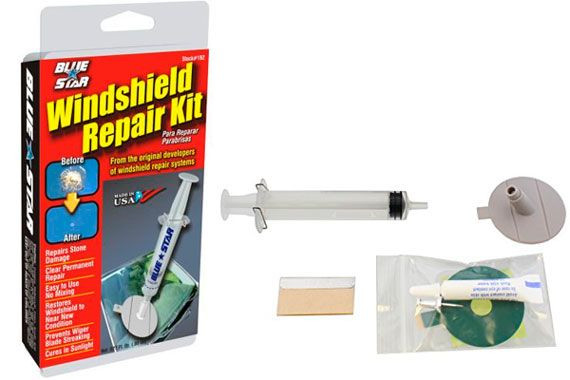
- Windshield repair kit makers tell you how to get the best results when you use their product. Most windshield repair products work best when cracks are less than 12” long, and pits are less than 1” diam.
- Thoroughly clean your entire windshield, including the pit or cracked area. All loose particles must be removed from the damaged area.
- Place the kit’s applicator directly over the damaged area. Insert the extension base over the applicator.
- The resin fill completes the repair. Place the resin tube/syringe over the applicator extension and tightly secure it. Applying too much pressure when tightening can crack your windshield. Tighten the resin syringe over the applicator extension just enough to create a resin chamber to remove all the air inside the applicator.
- Shoot 6 - 10 drops of resin inside the applicator.
- Place the screw provided in your repair kit inside the resin chamber. Tighten it (clockwise), so the resin is firmly pressed against your windshield. Let it set for 5 -10 minutes.
- Unscrew and remove the applicator kit after 5 - 10 minutes when the resin has solidified. The repair is complete!
- Cure the resin per your windshield repair kit instructions. Some products instruct you to place the windshield in direct sunlight to cure while others instruct you to do the opposite.
- Remove excess resin with a razor blade when curing is complete. Wipe your windshield clean.
